Apache POI
사용자에게 요구 데이터를 보여 주는 방법은 여러가지가 있다. 보통은 웹 페이지의 화면으로 보여주는데 사용자의 요구사항에 따라 데이터를 엑셀 파일에 담아서 다운 받게 할 수 있다. 이를 위해 필요한 것이 Apache POI 라이브러리이다.
Apache POI 란?
Apache POI는 아파치 소프트웨어 재단에 의해 운영되는 오픈소스 프로젝트이다. 순수 자바 라이브러리로서 Microsoft Office의 Word, PowerPoint, Excel 형식의 파일을 읽고 쓸 수 있게 한다.
Apache POI 라이브러리 설치하기
maven 프로젝트의 pom.xml 파일에 poi와 poi--ooxml dependency 를 추가하여 POI 라이브러리를 설치한다.
https://mvnrepository.com/artifact/org.apache.poi/poi
https://mvnrepository.com/artifact/org.apache.poi/poi-ooxml
        <!-- https://mvnrepository.com/artifact/org.apache.poi/poi -->
        <dependency>
            <groupId>org.apache.poi</groupId>
            <artifactId>poi</artifactId>
            <version>5.1.0</version>
        </dependency>
        <!-- https://mvnrepository.com/artifact/org.apache.poi/poi-ooxml -->
        <dependency>
            <groupId>org.apache.poi</groupId>
            <artifactId>poi-ooxml</artifactId>
            <version>5.1.0</version>
        </dependency>
예제 ) POI를 이용하여 Excel 파일 생성 및 다운로드
예제에 들어가기 앞서 필자는 문서 화면에서 API를 테스트할 수 있는 Swagger 라이브러리를 사용하였다.
- 참고 > Swagger 라이브러리 사용법
https://twofootdog.github.io/Spring-Spring-MVC%EC%97%90-Swagger-%EC%A0%81%EC%9A%A9%ED%95%98%EA%B8%B0/
먼저, Swagger 라이브러리를 적용한 후, ExcelCtrlDoc.java 파일을 생성하여 Api 문서를 작성한다.
@Operation(summary = "메뉴 엑셀 다운로드")
  @ApiResponses(value = { @ApiResponse(responseCode = "200", description = "성공", content = {
      @Content(mediaType = "application/json", schema = @Schema(implementation = MenuExcelDownloadResponse.class)) }), })
  abstract public void menuExcelDownload(HttpServletRequest request, HttpServletResponse response) throws Exception;

  public static class MenuExcelDownloadResponse extends ComResponseDto<Void> {
  }
이후 ExcelCtrlDoc.java를 상속받는 ExcelCtrl.java(컨트롤러)를 생성하여 context path에 /excel이 붙은 경로로 get 방식 http 통신을 할 메소드를 생성한다.
@GetMapping("/excel")
  public void menuExcelDownload(HttpServletRequest request, HttpServletResponse response) throws Exception {

  }
앞으로 이 메소드에 아래와 같은 API를 구현하기 위한 코드를 작성할 것이다.
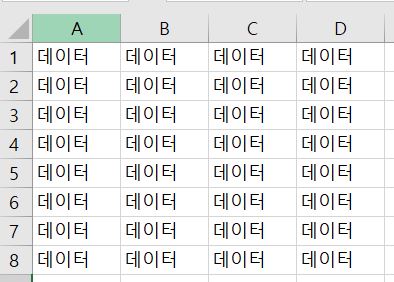
엑셀 파일을 생성하여 시트/행/셀을 생성하고, 그 중 일부 셀은 병합한다. 각 셀에 데이터를 담고, 폰트 설정과 셀 스타일 설정을 한 다음, 브라우저에서 다운로드 할 수 있게 한다.
엑셀 파일 생성 및 데이터 추가
Excel의 기본적인 구성은 아래와 같다. 이를 알고 있으면 코드를 이해하기가 수월하다.
엑셀 파일 > 엑셀 시트 > 개별 행(Row) > 개별 셀(Cell)
- 워크북(액셀 파일)에 시트를 생성한다.
- 시트 안에 행, 행 안에 셀을 생성하고, 각 셀에 데이터를 담는다.
- 워크북을 엑셀 파일 형태로 저장한다.
@GetMapping("/excel")
    public void menuExcelDownload(HttpServletRequest request, HttpServletResponse response) throws Exception {
    /*--------(1)-------*/
        //  workbook 생성 (엑셀 파일 생성)
        SXSSFWorkbook workbook = new SXSSFWorkbook();

        // "시트이름" 이 이름인 시트를 생성한다.
        Sheet sheet = workbook.createSheet("시트이름");
    /*--------(2)-------*/
        // row는 열, 한 칸은 cell
        Row row = null;
        Cell cell = null;

        // 행은 8 행, 셀은 각 행에 총 4 칸씩 생성된다.
        for ( int i = 0; i < 8; i++) {
            row = sheet.createRow(i);

            for ( int j = 0 ; j < 4; j++) {
                cell = row.createCell(j);
        // i 행 j 칸에 "데이터"라는 값 추가
                cell.setCellValue("데이터");
            }
        }
    /*--------(3)-------*/
    // 엑셀 파일 형태로 저장하기
    //  HTTP 헤더 부분의 Content-Type을 이진 데이터로 정의한다.
        response.setContentType("application/octet-stream");
    // 브라우저에서 파일을 저장 또는 다름이름으로 저장 여부를 설정할 수 있게 하고, 파일 이름을 지정한다.
        response.setHeader("Content-Disposition","attachment; filename=\"menu.xlsx\"");

    //워크북을 생성된 menu.xlsx 엑셀 파일 형태로 저장
        workbook.write(response.getOutputStream());
}SXSSFWorkbook- 워크북(엑셀) 객체Sheet- 시트 객체Sheet createSheet(String sheetname)- 워크북(엑셀)에 sheetname을 이름으로 가지는 시트를 생성하는 메소드Row- 행 객체Cell- 셀 객체Row createRow(int rownum)- 시트에 rownum 번째 행을 생성하는 메소드Cell createCell(int column)- 행에 column 번째 셀을 생성하는 메소드void setCellType(CellType cellType)- 셀에 "데이터" 값을 담는 메소드void setContentType(String type)- HTTP 헤더 부분의 Content-Type을 정의하는 메소드 (실행 결과를 브라우저로 내보낼 때, HTML 브라우저로 전송하는 정보 타입을 정의하는 메소드)application/octet-stream- 모든 이진 데이터(바이너리 데이터)를 전송하기 위한 8비트 단위의 MIME의 개별 타입void setHeader(String name, String value)- name 헤더의 값을 value로 지정하는 메소드"Content-Disposition","attachment; filename=\"menu.xlsx\""- Content-Disposition 헤더의 값을 attachment 로 지정하면 해당 데이터를 수신받은 브라우저가 파일을 저장 또는 다른이름으로 저장 여부를 설정하게 할 수 있고, 컨텐츠를 로컬에서 다운로드 할 수 있다. filname 파라미터에 로컬에 저장되는 파일 이름을 지정해줄 수 있다.write(OutputStream stream)- 워크북을 출력 스트림에 저장하는 메소드OutputStream getOutputStream()- 출력 스트림을 얻는 메소드
스트림(stream)이란 데이터의 흐름이라고 할 수 있다.
우리는 스트림이라는 통로를 통해 원하는 데이터를 주고 받는 것이다.
- 결과 이미지
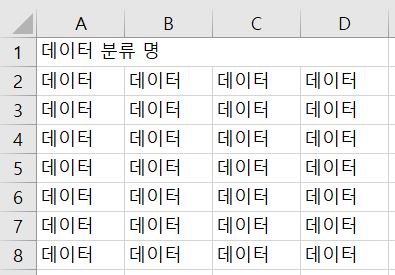
셀 병합
셀 영역을 지정하여 병합하고, 병합한 셀 값에 "데이터 분류 명" 을 추가한다.
        for ( int i = 0; i < 8; i++) {
            row = sheet.createRow(i);

      // i(i=0)부터 i(i=0)행 까지 0번째 칸부터 3번째 칸까지 병합함.
            if(i==0) {
                sheet.addMergedRegion(new CellRangeAddress(i, i, 0, 3)); // 열시작, 열종료, 행시작, 행종료
            }
            for ( int j = 0 ; j < 4; j++) {
                cell = row.createCell(j);

                if(i==0) { //첫번째 행에 "데이터 분류 명" 셀 값 추가
                    cell.setCellValue("데이터 분류 명");
                }else {
                    cell.setCellValue("데이터");
                }
            }
        }
int addMergedRegion(CellRangeAddress region)- 셀을 병합하는 메소드CellRangeAddress(int firstRow, int lastRow, int firstCol, int lastCol)- 열시작, 열종료, 행시작, 행종료로 셀의 범위를 설정할 수 있는 객체
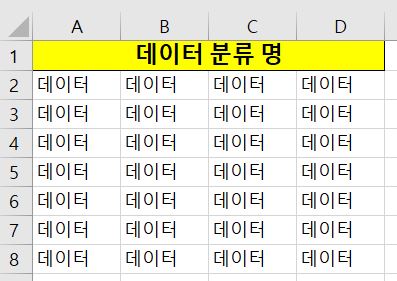
폰트 및 스타일 설정
셀 스타일 객체를 생성하고, 셀 스타일 설정 메소드를 사용하여 스타일 설정을 한다.
폰트 객체를 생성하고, 폰트 설정 메소드를 사용하여 폰트 설정을 담아서 스타일 객체에 폰트 객체를 적용시킨다.
<스타일 지정>
폰트 스타일 : bold, 14pt
셀 스타일 : 배경(노란색,가득찬 패턴), 테두리, 수평 및 수직 중앙 정렬
    // 스타일 객체 생성
        CellStyle titleStyle = workbook.createCellStyle();

        // 배경 색상 및 패턴
        titleStyle.setFillForegroundColor(IndexedColors.YELLOW.index);
        titleStyle.setFillPattern(FillPatternType.SOLID_FOREGROUND);

        // 아래,위,왼,오른쪽 테두리 적용
        titleStyle.setBorderBottom(BorderStyle.THIN);
        titleStyle.setBorderTop(BorderStyle.THIN);
        titleStyle.setBorderLeft(BorderStyle.THIN);
        titleStyle.setBorderRight(BorderStyle.THIN);

        // 수평 중앙 정렬
        titleStyle.setAlignment(HorizontalAlignment.CENTER);
        // 수직 중앙 정렬
        titleStyle.setVerticalAlignment(VerticalAlignment.CENTER);

    // 폰트 객체 생성
        Font titleFont = workbook.createFont();
        // 폰트 설정
        titleFont.setBold(true);
        titleFont.setFontHeightInPoints((short)14);
    // 폰트 스타일 적용
titleStyle.setFont(titleFont);CellStyle- 셀 스타일 객체CellStyle createCellStyle()- 셀 스타일을 생성하고, 워크북의 스타일 테이블에 저장하는 메소드void setFillForegroundColor(short bg)- 전경색을 지정하는 메소드IndexedColors.YELLOW.index- 노란색void setFillPattern(FillPatternType fp)- 셀을 전경색으로 채우기 위한 메소드FillPatternType.SOLID_FOREGROUND- 전경을 채우기 위한 값void setBorder[Bottom/Top/Left/Right] (BorderStyle border)- 셀의 아래 테두리/위 테두리/왼쪽 테두리/오른쪽 테두리를 설정할 수 있는 메소드BorderStyle.THIN- 얇은 테두리void setAlignment(HorizontalAlignment align)- 셀 수평 정렬 메소드HorizontalAlignment.CENTER- 수평 중앙 정렬void setVerticalAlignment(VerticalAlignment align)- 셀 수직 정렬 메소드VerticalAlignment.CENTER- 수직 중앙 정렬Font- 폰트 객체void setBold(boolean bold)- 폰트 두께를 굵게(bold)로 설정하는 메소드void setFontHeightInPoints(short height)- 폰트 크기를 설정하는 메소드void setFont(Font font)- 셀 스타일에 폰트 설정을 담는 메소드
최종결과물 전체코드
@GetMapping("/excel")
    public void menuExcelDownload(HttpServletRequest request, HttpServletResponse response) throws Exception {

        SXSSFWorkbook workbook = new SXSSFWorkbook();
        Sheet sheet = workbook.createSheet("시트이름");
        Row row = null;
        Cell cell = null;

        Font titleFont = workbook.createFont();
        titleFont.setBold(true);
        titleFont.setFontHeightInPoints((short)14);

        CellStyle titleStyle = workbook.createCellStyle();
        titleStyle.setFont(titleFont);
        titleStyle.setFillForegroundColor(IndexedColors.YELLOW.index);
        titleStyle.setFillPattern(FillPatternType.SOLID_FOREGROUND);

        titleStyle.setBorderBottom(BorderStyle.THIN);
        titleStyle.setBorderTop(BorderStyle.THIN);
        titleStyle.setBorderLeft(BorderStyle.THIN);
        titleStyle.setBorderRight(BorderStyle.THIN);

        titleStyle.setAlignment(HorizontalAlignment.CENTER);
        titleStyle.setVerticalAlignment(VerticalAlignment.CENTER);

        for ( int i = 0; i < 8; i++) {
            row = sheet.createRow(i);
            if(i==0) {
                sheet.addMergedRegion(new CellRangeAddress(i, i, 0, 3));
            }
            for ( int j = 0 ; j < 4; j++) {
                cell = row.createCell(j);
                if(i==0) { //첫번째 ROW에만 STYLE 적용하기
                    cell.setCellValue("데이터 분류 명");
                    cell.setCellStyle(titleStyle);
                }else {
                    cell.setCellValue("데이터");
                }
            }
        }

        response.setContentType("application/octet-stream");
        response.setHeader("Content-Disposition","attachment; filename=\"menu.xlsx\"");

        workbook.write(response.getOutputStream());
        workbook.close();

    }
더 많은 poi 라이브러리에 정의된 객체, 메소드, 설정값 등의 정보가 궁금하다면, 아래의 링크를 통해 찾아볼 수 있다.
https://poi.apache.org/apidocs/4.0/org/apache/poi/ss/usermodel